

About a year ago I built a gaming table in my basement. After finishing the table I had planned to create some Zone Mortalis tiles. However after losing a fight with an ice tea jug, I put the project on hold.
Fast forward to March and everything seems to fall into place.
· My hand is mostly healed
· Blacksword from the 40kfightclub starts posting pictures of his board he is making
· My garage is mostly clean
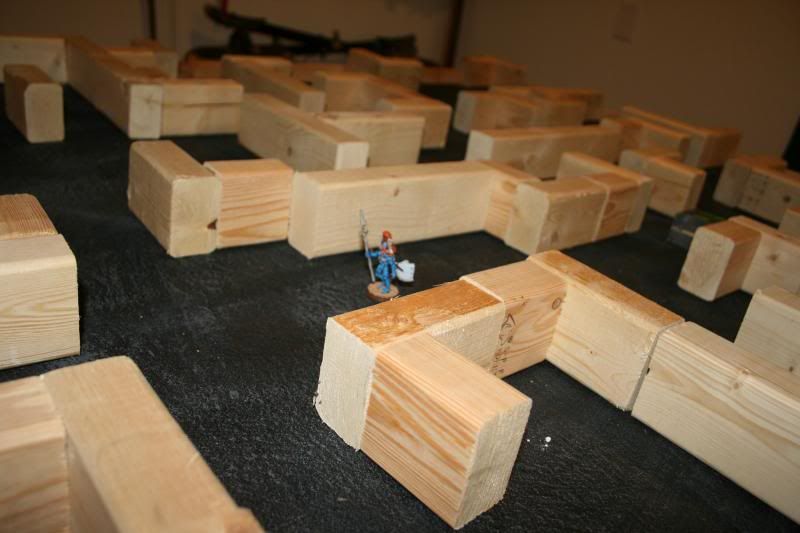 So what the hell. I break out some of my daughter’s crayons and my wife’s old graph paper and draw up a couple of tiles. Looking at the Zone tiles they are 1 sq. ft and setup in third’s to make them interchangeable. So a basic wall/door layout would be 4 inches of wall, a 4 inch door and 4 more inches of wall. By varying which sections of exterior wall would be open and which interior corridors wall were open it wasn’t long before I had drawn up a 24 tiles (enough for a 4 by 6 ft table).
 The walls are also really thick (2 inches). Easy enough, if I want 2 inch wall all I need are a few 2 by 4’s. Anyone who has every worked with wood before knows this isn’t true a 2 by 4 should actually be called a 1.5 by 3.5 but it was close enough for me as I had extra 2 by 4’s in my garage. Taking the blueprint I was able to figure out how many of each length of wood I would need. For example I needed 42 basic 4 inch by 4 inch corners which consisted of a 4 inch piece and a 2.5 inch piece so it was off to the saw and a half hour later I had pile of wood pieces ranging from 2.5 inches to 12 inches.Next step is gluing the pieces together. This was done with basic wood glue and clamps, of which I have only 3 so it took about a week to get everything glued together.
The delay was good because it let me address the two other aspects of this project. Just having walls isn’t enough. The walls need to have some decoration on them. For this step I shameless stole from A Gentleman’s One who mentioned that Flying Tricycle did some cardboard cutouts for him. After a few emails with Flying Tricycle and a small Paypal payment some lasered cardboard was on its way. So that problem was mostly solved.
Now what to put them on? I could leave them unbased like Blacksword did but one of the things I like about the forgeworld models is the floor giving a real feel of a ship. I'm willing to give up some flexibility for aesthetics. I thought about using plywood but I don’t have a table saw to cut 12 inch squares with and because of the saw blade you can only get 21 squares from a 4 by 8 piece of wood which seems like a waste. I also explored some tiles that were in my basement. The vinyl tiles were the right size but couldn’t hold the weight of the wood (no surprise). The ceramic tiles held the weight but were heavier and I wasn’t sure how to attach the wood to them.
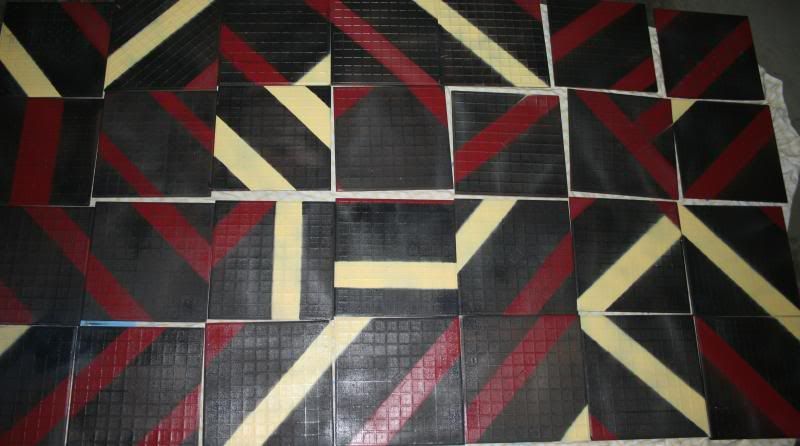
The ceramic tiles seemed like the best option so I went to the Habitat for Humanity store near my work and picked up a properly sized tile for a whopping $.25. I know costs for this project are getting out of control. A quick test revealed that the caulk holds just fine, especially since I decided to flip the tile upside down to take advantage of the texture that is there. So back to the store and 31 more tiles later I have my bases. Picking up some paint on my way home I start to paint them all black, after a trip to the store to get more paint, all but three are black. For some reason one style of tile would literally absorb the paint no matter how much was put on, fortunately I only had three of this type. So back to habitat for two more tiles (I had a use for the third). After that I laid some scrap lumber on them, place a 2x4 next to the scrap, place another piece of scrap and remove the 2x4 than I spray painted the area where the 2x4 was red or yellow to create some contrast. And applied a matte coat on top as the models will be scrapping it a lot.
The ceramic tiles seemed like the best option so I went to the Habitat for Humanity store near my work and picked up a properly sized tile for a whopping $.25. I know costs for this project are getting out of control. A quick test revealed that the caulk holds just fine, especially since I decided to flip the tile upside down to take advantage of the texture that is there. So back to the store and 31 more tiles later I have my bases. Picking up some paint on my way home I start to paint them all black, after a trip to the store to get more paint, all but three are black. For some reason one style of tile would literally absorb the paint no matter how much was put on, fortunately I only had three of this type. So back to habitat for two more tiles (I had a use for the third). After that I laid some scrap lumber on them, place a 2x4 next to the scrap, place another piece of scrap and remove the 2x4 than I spray painted the area where the 2x4 was red or yellow to create some contrast. And applied a matte coat on top as the models will be scrapping it a lot.
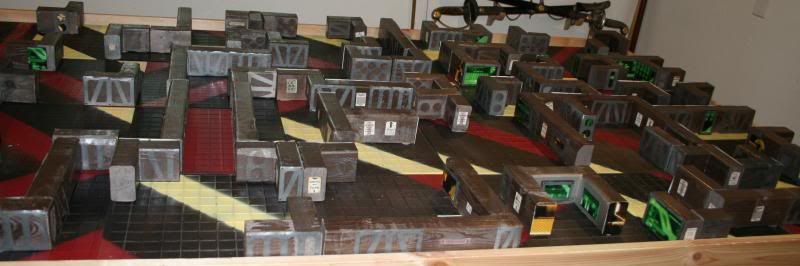 Next came painting the walls. After a couple of tests I decided to go with bronze background with silver Easy enough, paint the wood bronze and the Great plan but problems arose. First the wood used a lot more paint than I thought it would as a result I had to make a couple more trips to Meijer to pick up paint. Second you may have noticed that I bought 32 tiles not the 24 I had originally planned on. At some point I had decided to make a full 4 by 8 foot board to allow for “special” rooms. However this meant I had more walls to fill and not enough cutouts to do so. This was easily solved by painting the wood silver using the cardboard as a template and spraying the wood again bronze. This off course meant going back to the store to get more paint.
cardboard silver and slap the two together.
faceplates.

Final steps consisted of gluing the cardboard to the wall which sounds simple but Brian at A Gentleman’s One had warned me that wood glue would warp the cardboard. I tested plain elmer’s glue and it seemed to hold fine but a problem appeared quickly. The cardboard was cut to be just under 3.5 inches high, which was the perfect height, except that 2x4s have rounded edges, this meant that about an 1/8 of an inch of the back was exposed which I hadn’t painted. Lots of rubber bands later, the cardboard was on. If I did this again I would have the cardboard cut slightly smaller and use wood glue to attach. The combination of the flap and the weaker glue has resulted in a couple of pieces needing to be glued back on after catching on something. At this time I also attached some city of death posters I found on warseer doing a google search (http://www.warseer.com/forums/showthread.php?138549-Imperial-Propaganda-Posters-and-Signs). The final step was just attaching the wood to the tile which was easy because I had used the bottom of the tile which was intended to be caulked to subflooring. The only issue I had with the caulk was in a couple places I used too much and it was visible (not a big deal) and on the tile that I had used the traditional top the wood+caulk ripped the paint off the tile so I had to reattach the wood/paint to the tile. The project was fairly simple, cheap (total cost of $130 dollars), fun and I think effective.


This seems really, really good! I'd like to see more pictures so I can steal the idea.
ReplyDeleteThanks. More pictures can be found on the fightclub forum. Here is a a link to the thread. http://40kfightclub.com/modules.php?name=Forums&file=viewtopic&t=25984&start=15
ReplyDeleteAlso check out a Gentleman's One from March/April. He did his project differently (set tables) but has some real nice touches and ideas.
ReplyDelete